How to Build Powerful AI Agents with Microsoft AutoGen: A Comprehensive Guide
Explore the power of AutoGen, an open-source Python library by Microsoft, designed to simplify AI agent creation. From setting up your environment to real-world applications and advanced features, learn how AutoGen is revolutionizing the AI landscape.

Diving headfirst into the fast-paced world of Artificial Intelligence (AI), the quest to construct advanced AI agents is an essential pursuit. Microsoft's AutoGen — an innovative open-source Python library — is here to help. This all-encompassing guide will navigate you through the process of harnessing AutoGen to construct durable AI agents, with an emphasis on hands-on examples and detailed explanations to give you a firm grasp of the framework.
Step 1: Kick-starting Your Journey with AutoGen
In the dynamic sphere of AI, where the norms are always shifting, Microsoft's AutoGen shines as a beacon of progress. This open-source Python library provides a strong foundation for developers to build potent AI agents with ease. Before we explore the practical uses of AutoGen, it's crucial to get the framework up and running in your development environment.
AutoGen, supported by Microsoft and enriched by a community of passionate developers, is designed to tackle the challenges involved in creating and managing AI agents. The library offers a range of features intended to simplify the development process, making it a valuable tool for developers.
Setting Up Your Development Environment
Before you set sail on the AutoGen adventure, make sure your machine is equipped with the latest version of Python. It's wise to set up a virtual environment to manage dependencies effectively, protecting your project from potential conflicts.
# Creating a virtual environment
python3 -m venv autogen_env

# Activating the virtual environment
source autogen_env/bin/activate  # On Windows, use `autogen_env\Scripts\activate`

# Installing essential libraries
pip install numpy pandas

# Installing AutoGen
pip install pyautogen
Using a virtual environment provides a safe space for your project dependencies, which is a recommended practice in Python development.
Integrating Docker
For an isolated code execution environment, installing the Python Docker package is a great idea. Docker wraps all necessary dependencies in a container, ensuring consistent behavior across different environments, which is essential for collaborative development and deployment.
# Installing Docker
pip install docker
By leveraging Docker, developers can avoid the infamous "it works on my machine" issue, promoting a smooth development and deployment process.
Step 2: Getting to Know the AutoGen Framework
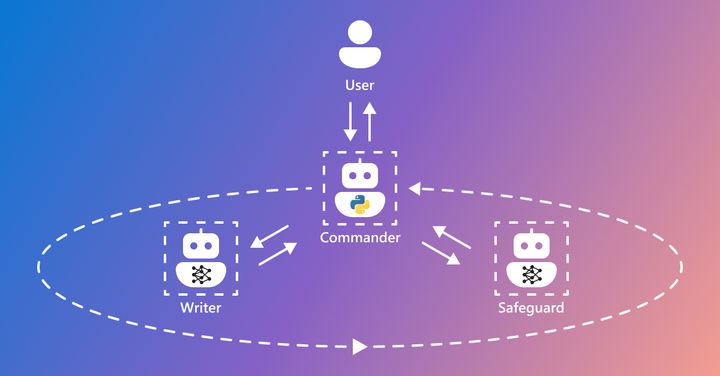
AutoGen thrives with its multi-agent conversation framework. This unique feature allows the creation of customizable and conversable agents. These agents are proficient at merging Large Language Models (LLMs), tools, and human inputs, thereby creating a collaborative environment to achieve complex tasks.
Key Principles and Architecture
The core strength of AutoGen lies in its ability to support multi-agent systems. The architecture is designed to enable seamless communication between agents, each with a specific role, working together to achieve a common goal. The integration of Large Language Models (LLMs) enhances the agents' capabilities, enabling them to understand and process natural language inputs efficiently.
Configuring and Customizing Agents
Creating an agent in AutoGen is a straightforward task. Here’s a simple snippet to create an agent and start a conversation:
from autogen import AssistantAgent, config_list_from_json

# Load LLM inference endpoints from an environment variable or a file
config_list = config_list_from_json(env_or_file="OAI_CONFIG_LIST")
agent = AssistantAgent("simple_agent", llm_config={"config_list": config_list})

# Initiate a conversation
response = agent.query("Hello, AutoGen!")
print(response)
In this snippet, we define a new agent named "simple_agent", and configure it to interact with a Large Language Model. The query method is then used to start a conversation with the agent, demonstrating a basic interaction.
AutoGen’s framework is designed to be intuitive yet robust, providing ample scope for customization to cater to diverse use cases. Developers can adjust the behavior of agents, define custom conversation flows, and much more, unlocking a world of possibilities.
Step 3: Building Your First AI Agent with AutoGen
Beginning your AutoGen journey involves understanding the basic constructs crucial for creating and interacting with agents. The following example explains how to create a multi-agent system to plot the year-to-date (YTD) stock price changes of NVDA and TESLA. This is a demonstration of AutoGen’s ability to handle real-world situations.
You can download sample notebook with autogen examples made by Microsoft on Guthub.
Required Libraries
The underlying libraries, yfinance and matplotlib, are vital in this endeavor. The yfinance library is essential for fetching stock data, while matplotlib is used for plotting the stock price data.
# Importing necessary libraries and modules
from autogen import AssistantAgent
import yfinance as yf
import matplotlib.pyplot as plt
Creating and Interacting with Agents
Creating agents is a smooth process with AutoGen. In this snippet, two agents are created; data_agent fetches the stock data while plot_agent is responsible for plotting the stock data.
# Create agents
data_agent = AssistantAgent("data_agent")
plot_agent = AssistantAgent("plot_agent")

# Define the function to fetch stock data
def fetch_stock_data(ticker):
    stock = yf.Ticker(ticker)
    return stock.history(period="ytd")

# Fetch stock data
nvda_data = data_agent.run_function(fetch_stock_data, args=("NVDA",))
tesla_data = data_agent.run_function(fetch_stock_data, args=("TSLA",))

# Define the function to plot stock data
def plot_stock_data(data, title):
    data['Close'].plot()
    plt.title(title)
    plt.show()

# Plot stock data
plot_agent.run_function(plot_stock_data, args=(nvda_data, "NVDA Stock Price YTD"))
plot_agent.run_function(plot_stock_data, args=(tesla_data, "TESLA Stock Price YTD"))
This example showcases AutoGen’s user-friendly interface and its ability to handle real-world tasks efficiently. Assigning tasks to different agents promotes a clean, organized, and scalable codebase.
Example 1: Constructing a Customer Service Agent System
In a retail setting, customer inquiries about order status are a common occurrence. AutoGen excels in such scenarios by enabling the creation of a multi-agent system. The following example outlines a customer service scenario involving three agents: Alex (CS Agent), Taylor (Sales Agent), and Jordan (Manager). These agents interact based on predefined prompts in a configuration file, orchestrating a seamless customer service experience while simultaneously gathering valuable NPS feedback.
Understanding the Configuration File
The configuration file is the key that drives the agent interaction logic. It outlines the prompts for each agent, ensuring a coherent conversation flow.
{
    "agents": {
        "alex": {
            "prompts": {
                "greeting": "Hello! This is Alex. How can I assist you today?",
                "order_inquiry_response": "I can help with that. May I have your order number, please?",
                "escalation_request": "I apologize for the inconvenience. Would you like to speak with our manager, Jordan?"
            }
        },
        "taylor": {
            "prompts": {
                "upsell_offer": "By the way, we have a promotion on expedited shipping for future orders. Would you be interested?"
            }
        },
        "jordan": {
            "prompts": {
                "escalation_greeting": "Hello, this is Jordan, the Manager. How may I assist you further?",
                "satisfaction_check": "We aim to provide excellent service. Did we address all your concerns today?",
                "NPS_question": "On a scale of 0 to 10, how likely are you to recommend our store to a friend or colleague?"
            }
        }
    }
}
Each agent has a set of prompts that guide their interactions with the customer. For instance, when Alex receives an order inquiry, he responds by asking for the order number.
from autogen import AssistantAgent, config_list_from_json

# Load configuration from a file
config = config_list_from_json('config.json')

# Create agents based on the configuration
alex = AssistantAgent('alex', config=config['agents']['alex'])
taylor = AssistantAgent('taylor', config=config['agents']['taylor'])
jordan = AssistantAgent('jordan', config=config['agents']['jordan'])

# Simulate a customer inquiry
customer_inquiry = "I'd like to know the status of my order."
response = alex.query(customer_inquiry)
print(response)  # Output: I can help with that. May I have your order number, please?

# ...continue the conversation based on customer and agent interactions.
In this code snippet, we first load the configuration from a file, which contains predefined prompts for each agent. We then create three agents, alex, taylor, and jordan, based on the configuration. A customer inquiry is simulated by asking alex, and the conversation continues based on the interactions between the customer and agents.
Example 2: Setting Up a Multi-Agent System for Real-Time Analytics
In today's digital economy, real-time analytics are the backbone of informed decision-making. Businesses are constantly seeking platforms that can provide actionable insights in real time. AutoGen is a worthy candidate in this arena, enabling the creation of robust multi-agent systems proficient in real-time analytics.
Defining Agent Roles and Responsibilities
In this example, a business monitors the performance of its online sales platform using a well-coordinated multi-agent system. The agents, each with a specified role, work together to collect, process, and analyze data, providing actionable insights.
{
    "agents": {
        "DCA": {
            "role": "Data Collection",
            "sources": ["website_traffic", "sales_data", "customer_feedback"]
        },
        "DPA": {
            "role": "Data Processing",
            "metrics": ["traffic_volume", "conversion_rate", "feedback_score"]
        },
        "DAA": {
            "role": "Data Analysis",
            "insights": ["peak_traffic_time", "highest_selling_product", "customer_satisfaction_index"]
        }
    }
}
- Data Collection Agent (DCA): This agent is responsible for data collection, diligently gathering data from various sources like website traffic, sales data, and customer feedback.
- Data Processing Agent (DPA): After data collection, the DPA takes over, processing the raw data and extracting key metrics like traffic volume, conversion rate, and feedback score.
- Data Analysis Agent (DAA): The DAA is the final piece of the puzzle, analyzing the processed data to uncover actionable insights such as peak traffic time, highest selling product, and customer satisfaction index.
Setting Up a Real-Time Analysis Pipeline
The smooth interaction between the agents encapsulates a robust real-time analytics pipeline. The DCA provides the raw data to the DPA, which then processes the data and hands it over to the DAA for thorough analysis. The insights gained are invaluable for business strategizing and prompt decision-making.
from autogen import AssistantAgent, DataCollectionAgent, DataProcessingAgent, DataAnalysisAgent

# Create agents
DCA = DataCollectionAgent('DCA')
DPA = DataProcessingAgent('DPA')
DAA = DataAnalysisAgent('DAA')

# Define data sources
data_sources = {
    'website_traffic': ... ,  # some data source
    'sales_data': ... ,       # some data source
    'customer_feedback': ...  # some data source
}

# Collect data
collected_data = DCA.collect(data_sources)

# Process data
processed_data = DPA.process(collected_data)

# Analyze data
analysis_results = DAA.analyze(processed_data)

# Print or use the analysis results
print(analysis_results)
In this code snippet, we create three agents: DCA for data collection, DPA for data processing, and DAA for data analysis. The DCA collects data from defined data sources, the DPA processes the collected data, and the DAA analyzes the processed data to provide actionable insights. The analysis results can then be printed or used for further actions.
These code snippets give a practical illustration of how AutoGen can be used in customer service and real-time analytics scenarios.
Step 4: Delving into AutoGen's Advanced Features
AutoGen's versatility is a testament to its well-designed structure. It’s not just a simple tool; its features extend beyond the basic functionalities, catering to the evolving needs of developers and businesses alike.
Scalability
In the face of growing data and increasing complexities, AutoGen stands strong. Its framework is designed for scalability, ensuring your multi-agent systems can grow alongside your needs without losing any momentum.
Integration Capabilities
AutoGen is not an isolated entity; its integration capabilities are a blessing for developers. Whether it's integrating with other software systems, databases, or APIs, AutoGen enables a smooth integration, promoting a unified ecosystem.
Real-Time Monitoring
The real-time monitoring feature acknowledges the needs of modern applications. It allows developers and businesses to keep a close eye on their multi-agent systems, ensuring everything is running smoothly.
Customizable Agent Behavior
Every application is unique, and AutoGen acknowledges that. It offers a wide range of customization options for agent behavior, ensuring your agents can be tailored to fit your specific use case.
Robust Error Handling
In the real world, errors are inevitable. AutoGen’s robust error handling mechanisms ensure that your multi-agent systems are well-equipped to deal with any hiccups, ensuring a seamless operation even when things don't go as planned.
Step 5: Exploring Community Resources and Contributions
The vibrancy of the AutoGen community is a testament to the framework's importance and potential in the AI domain. A wealth of resources and a welcoming community await developers eager to explore and contribute to the AutoGen ecosystem.
Comprehensive Documentation
A key feature of any robust framework is comprehensive documentation, and AutoGen is no exception. The documentation is a treasure trove of knowledge, providing insights into the framework's capabilities, best practices, and how to start building powerful AI agents.
Forums and Discussion Boards
Engagement within the community is facilitated through forums and discussion boards. These platforms are a conduit for knowledge exchange, where developers can seek advice, share their experiences, and discuss the numerous possibilities AutoGen presents.
Open-Source Contribution Opportunities
AutoGen's open-source nature paves the way for collaborative development. Developers are encouraged to contribute, whether it's by improving the framework, fixing bugs, or developing new features. The GitHub repository is the center of collaborative efforts, fostering a culture of shared learning and improvement.
Collaborative Development on GitHub
The AutoGen GitHub repository is a hive of activity. It's where developers can contribute code, report issues, and propose new features. The collaborative spirit on GitHub speeds up innovation, driving the framework towards maturity.
Wrapping Up
AutoGen is a powerful framework for building advanced AI agents. Its design caters to both simple customer service interactions and complex real-time analytics systems. With a comprehensive understanding of the framework, bolstered by the support of an active community, developers are well-positioned to explore, experiment, and contribute to the AutoGen ecosystem, thereby pushing the boundaries of what AI can achieve.
AutoGen opens up a world of possibilities that are truly exciting. Whether you're an experienced developer or a newcomer to the AI domain, AutoGen provides a solid foundation to build upon. The real-world applications are limitless, and with the support of an active community, the journey through AutoGen's landscape is a rewarding experience.
In conclusion, the importance of AutoGen in the contemporary AI landscape is highlighted, encouraging developers to immerse themselves in the AutoGen ecosystem, explore its capabilities, and contribute towards its evolution.
Frequently Asked Questions (FAQ'S)
- What is AutoGen?
AutoGen is an innovative open-source Python library developed by Microsoft, designed to simplify the creation and orchestration of AI agents. - How do I set up my environment to use AutoGen?
First, ensure your machine has the latest version of Python installed. Then, set up a virtual environment to manage your dependencies and safeguard against potential conflicts. Install the necessary libraries and AutoGen itself using pip. - What is the purpose of Docker integration with AutoGen?
Docker provides an isolated code execution environment, encapsulating all necessary dependencies in a container. This ensures consistent behavior across different environments, which is crucial for collaborative development and deployment. - What is a multi-agent conversation framework in AutoGen?
This unique feature of AutoGen allows developers to create customizable and conversable agents. These agents can integrate Large Language Models (LLMs), tools, and human inputs to accomplish complex tasks. - How do I create an agent in AutoGen?
Creating an agent in AutoGen is straightforward. You can define a new agent and configure it to interact with a Large Language Model using a few lines of code. Thequerymethod is then used to start a conversation with the agent. - Can I customize agent behavior in AutoGen?
Yes, AutoGen’s framework provides ample room for customization to cater to diverse use cases. Developers can tailor the behavior of agents, define custom conversation flows, and much more. - What are some practical applications of AutoGen?
AutoGen can be used to create robust AI agents for various applications, including customer service scenarios, real-time analytics, and more. It can be used to handle real-world tasks efficiently. - What are some advanced features of AutoGen?
AutoGen offers features like scalability, integration capabilities, real-time monitoring, customizable agent behavior, and robust error handling. These features extend beyond basic functionalities, catering to the evolving needs of developers and businesses. - Are there community resources available for AutoGen?
Yes, the AutoGen community offers comprehensive documentation, forums, discussion boards, and open-source contribution opportunities. The AutoGen GitHub repository is the epicenter of collaborative endeavors. - What potential does AutoGen hold in the field of AI?
AutoGen is a formidable framework for developing powerful AI agents. Its design caters to both simple customer service interactions and complex real-time analytics systems. It pushes the boundaries of what AI can achieve, opening up a vast realm of possibilities.


